Vet ej vad du har för årsmodell med torkar lucka eller utan.
Här är diagram för 1968 om det kan vara till någon hjälp.
lite text om funktionen
WIPER MOTOR OPERATION
The electrical portion of the wiper system is composed of the following components.
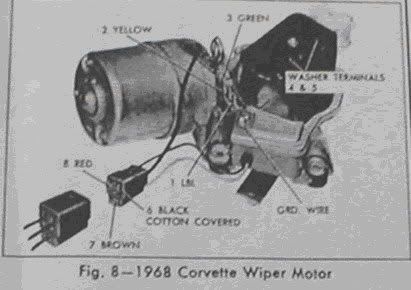
Wiper Motor and Dash Switch- The wiper motor used in this system is a 2 speed “Type C Depressed Park” motor (See Fig.

. It is mounted in the conventional manner on the firewall. The dash switch is a blade type mounted in the upper portion of the center instrument cluster.
Limit Switch- The limit switch has “normally open” contacts and is used to prevent wiper motor operation until the lid reaches the full open position. The lid, when it reaches full open position, activates the switch contacts to a closed position completing the motor armature circuit to ground via the service switch. The limit switch is located in the right portion of the plenum area.
Vacuum Control Solenoid-Although this solenoid was mentioned under the vacuum components it is also a part of the electrical components. The control solenoid in deactivated position allows vacuum to the relay valve diaphragm, which in turn keeps the wiper door shut. The solenoid when actuated cuts off vacuum to the relay valve diaphragm, which in turn opens the wiper door. The wiper switch controls current to the solenoid.
External Relay- The external relay has two functions: (1) With the ignition switch and the wiper dash switch “On”, it completes the wiper motor shunt field circuit to the dash switch and (2) it provides a by-pass circuit around the motor “Hi” speed resistor if the wiper dash switch is left in the “Hi” position when the ignition switch is turned off. The reason for the by-pass circuit is as follows:
If the there was no by-pass circuit and if the wiper dash switch was left in the “Hi” speed position when the ignition switch was turned off, the wiper motor would run in “Hi” speed while trying to park the blades. This would cause the wiper motor to recycle (blades would move in and out of the parking area rapidly and the wiper would not shut off). The by-pass circuit, however, causes the wiper motor to operate in “Lo” speed so that the wiper motor will park the blades and shut off correctly. This relay is mounted under the front of the floor console and is accessible after removing the trim pad on the right side of the cluster assembly.
Override Switch- A manually operated override switch (located next to the steering column under the dash) is connected in series with the limit switch and may be used to stop the blades on the windshield in a convenient position for service operations. Except when the operations require the use of the switch, it should always be left in the “Off” position (fully turned to the right). When the switch is left “On” even with the ignition switch OFF there is a low but constant drain on the battery.
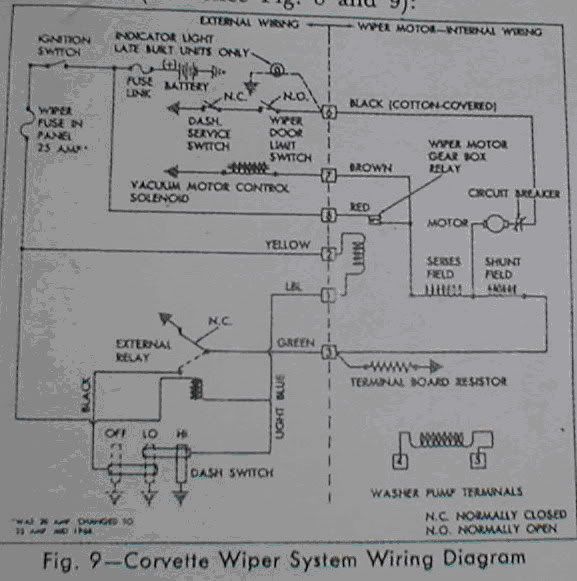
The electrical portion of the system operates as follows (reference Fig. * and 9):
Wiper Switch OFF- Turning the ignition switch On completes the battery positive (B+) circuit via wiper terminal No. 2 to one side of both the gear box and external relay coils. Note also that B+ is connected direct to wiper motor gear box relay switch via wiper terminal No. 8.
Lo Speed Circuit- Moving the dash switch to the “lo” speed position accomplishes three (3) functions simultaneously:
1. The wiper gearbox relay coil circuit is completed to ground at the dash via wiper terminal No. 1. With the coil energized, the relay switch contacts close completing the B+ circuit to (1) the motor windings and (2) via terminal No. 7 to the vacuum control solenoid.
2. With the control solenoid energized vacuum to the relay valve diaphragm is stopped, thus the wiper door starts to open.
3. The wiper external relay coil circuit is also completed to ground at the dash switch via wiper terminal No. 1. With this coil energized, the relay switch completes the wiper motor shunt field circuit from wiper terminal No. 3 to the dash switch. The dash switch completes the circuit to ground.
The motor armature circuit is completed to ground via terminal No. 6 when the lid has opened far enough to trip the limit switch. With the armature circuit completed, the wiper motor will start to run.
Hi Speed Circuit- Moving the dash switch to the “Hi” speed position opens the shunt field circuit to ground at the das switch. The shunt field current then flows through the 20-OHM resistor located on the wiper motor terminal board to ground.
NOTE: When the dash switch is in the “Lo” speed position, the shunt field current flows direct to ground at the dash switch bypassing the resistor.
Parking Circuit- When the owner first turns the wipers “Off” at the dash switch, two simultaneous functions occur:
1. The external relay coil circuit is opened to ground and the relay switch contacts change position to complete the motor shunt field circuit to ground at the relay switch. With the shunt field connected direct to ground, the wiper motor runs in “Lo” speed during the park cycle.
2. The motor gearbox relay coil circuit is opened to ground at the dash switch. However, at this stage of operation, the gearbox relay switch contacts remain closed maintaining B+ to the wiper motor windings and the vacuum control solenoid. With these circuits still complete, the wiper motor continues to run and the control solenoid stays energized, the lid stays in the open position, which in turn keeps the limits switch tripped.
Note: Keep in mind that the limit switch completes the motor armature circuit to ground when activated by lid.
Wiper Off- The wiper motor gearbox mechanism is programmed so that when the blades reach the park position, the gear mechanism opens the gearbox relay switch contacts. This shuts off the wiper motor and opens B+ circuit to the vacuum control solenoid, which allows the lid to close.